


Sizing of layouts can be a little confusing. However, as this is a key part of ProSelect, it is important that you understand exactly how they work.
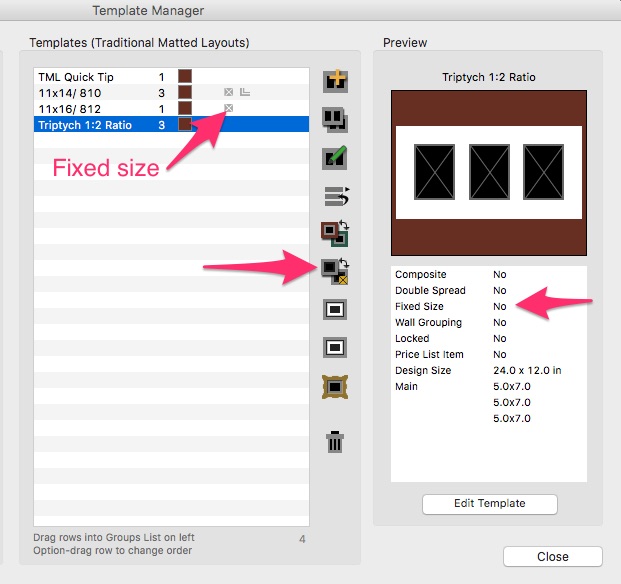
This article explains how sizing works when your templates are not set to be a fixed size (in the Template Editor). Fixed sized templates have a small square icon with a "X" in the bottom right corner of their thumbnail images. See the section at the bottom of this article for how to convert your templates to be fixed size types.
Fit Within
When doing any sizing, ProSelect does a "fit within" to one of your setup Print Paper Sizes.
This means that, if the size being fitted is "squarer" than your selected Print Paper Size, it will be fitted to the narrow side. If the size being fitted is "more rectangular" than your selected Print Paper Size, it will be fitted to the longer side.

In most places within ProSelect where you set the size of a layout (eg right-clicking the Lager or Smaller size icons in the tool bar), you will see both the resulting size and the print paper size that it came from. For example, for the sizes show above you would see
- 8x8 (8x10)
- 6x6 (6x9)
- 6.88x10 (8x10)
- 6x9 (6x9)
Keeping Things Simple
Creating a set of square Print Paper Sizes for sizing layouts (ie 8x8, 10x10, 14x14 etc.) will allow you to instantly size your layouts up and down with the long side of the layout sized to one of these sizes.
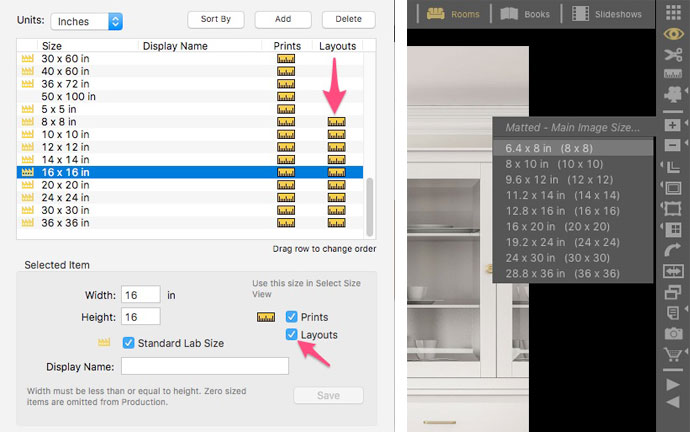
To reduce the available sizes to just these ones, make sure that only they are set to display for Layouts (have a ruler icon in the Layouts column) and all other sizes are turned off for Layouts (as shown on the left-side of screen grab below).
This will limit the available sizes for all layouts to just these ones when changing size or right-clicking on the Large or Smaller Size Tools (see right side of screen grab below). You can see that each resulting size has its long-side size matching the setup square size.
"Traditional Matted Sizes" versus "Composite Sizes"
All templates and layouts are either a Traditional Matted type or a Composite type. This controls how they are sized.
Traditional Matted Sizing - these types are sized by making the main opening in the layout fit within the selected Print Paper Size. (This is the #1 opening in your template design and normally the largest opening - as set by you). Any other openings in the layout are scaled proportionately based on the relative size of that opening to the main opening.
Composite Sizing - These types are sized my making the overall layout shape fit within a the selected Print Paper Size.

By default, all templates are Traditional Matted unless you check the Default to Composite Type checkbox for a template in the Template Editor
To make it easier to see which Type a template is, the thumbnails have a different background color. Traditional Matted templates have a dark red background and Composite types have a dark green background.
Changing the template or layout Type
You can select one or more templates and change their type to a different one using the Set Selected Template Types To... command under the Templates Menu. Likewise, you can change the type of any layouts using the Set Selected Layouts Types To... command under the Layouts Menu.
This allows you to easily show layouts of both types at correct sizes without having to change any settings.
If you are adding a template to the price list or using the Custom Product button to order a layout then the price list/order type will default to the template/layouts set type. However, you can override this by selecting the other type and the ordered item will be automatically converted to the other type when ordered. In other words, the orders setting always override template/layouts settings.
Default Starting Size
When you first display a non-fixed size layout in select size view or in a room, it will be sized to its design size. You can then use the larger size and smaller sized buttons in the toolbar to step through your print paper sizes (the one that you have marked to be used for Layout sizing - see above). Right-clicking on these buttons will display a popup menu showing all available sizes (as shown above) including the option to reselect the "Design Size".
Changing a Template to a Fixed Size Type
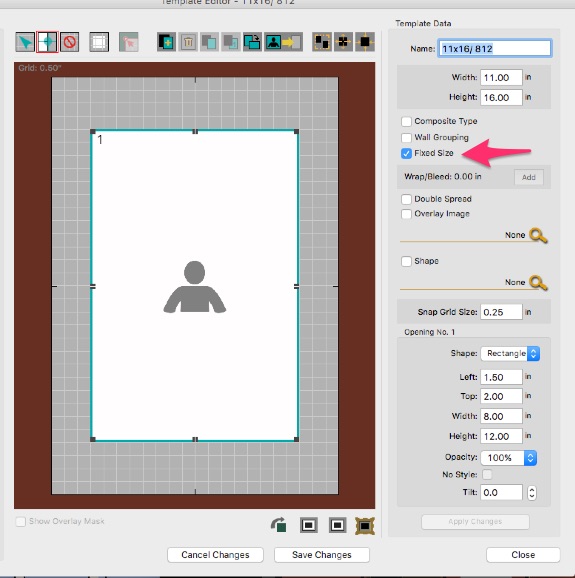
You can make a template a fixed size type by editing the template in the Template Editor and checking the Fixed Size checkbox then the Save Changes button.
Hint: to quickly select and edit a template when in Working with Layouts (Thumbnail view), right-click on the template and choose Edit Template.
You can also change one or more templates to/from a fixed size in the Template Manager using the Template Fixed Size On/Off button as shown below.
Other References
Refer to the ProSelect Reference Manual for more details (see Contents page for "Select Size View - How Layouts are Sized", "About Templates" and "Editing - Template Types & Opening Options"). Quick access can be found from under the Help menu.
KnowledgeBase Article: How Layouts are Sized