

Official Release Date: Sep 1, 2021
This page cover all major changes - see this Knowledgebase article for all the details.
When released, you can use the hyperlinks in What's New section at the back of the ProSelect 2022r1 Reference Manual (quick access under the Help menu in ProSelect) to get to the relevant new or updated sections in the manual.
A special thank you goes to Allison Tyler Jones for allowing us to use her beautiful image in the new splash screen.
Native on Apple M1 Processors
The Mac version is now a "universal binary" which will run at full speed on both Intel and the new M1-based machines.
The About ProSelect window will show if you are running the "Intel" version or the "M1 (Apple Silicon)" version of the software.
TopWindows 64-bit Version Now Available
ProSelect 2022r1 will now install as a full 64-bit application on 64-bit versions of Windows so you can take advantages of the extra memory installed in your computer.
On 32-bit versions of Windows, ProSelect will install as a 32-bit application.
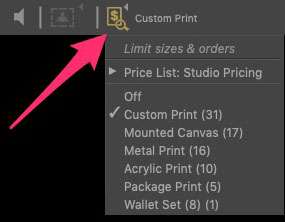
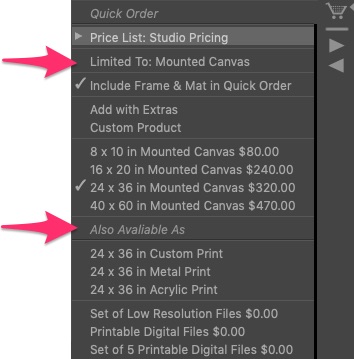
TopNew Product Filter
Take full control over the over the products and sizes you show.
In Working with Images (Select Size View) and Working with Rooms, just turn on the "Product Filter". When you select a presentation option, the sizes of any print products that you can show will be limited to those set up in your Price List.
The ordering windows will show "Limited to: Presentation Option Name" and only list sizes available for that Option.
The Quick Add to Order popup menu (right-click on the Shopping Cart icon) will also show what other Options are available in the selected size in the "Also Available As..." section.
To learn more about this feature, see the Tutorial Movie: Use the Product Filter.
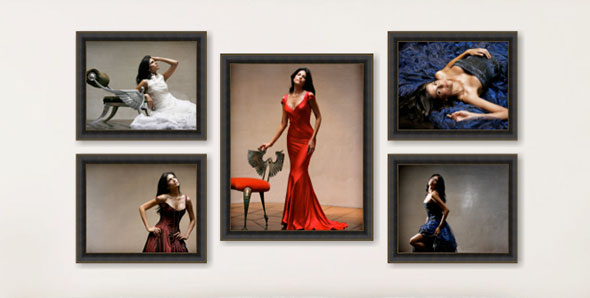
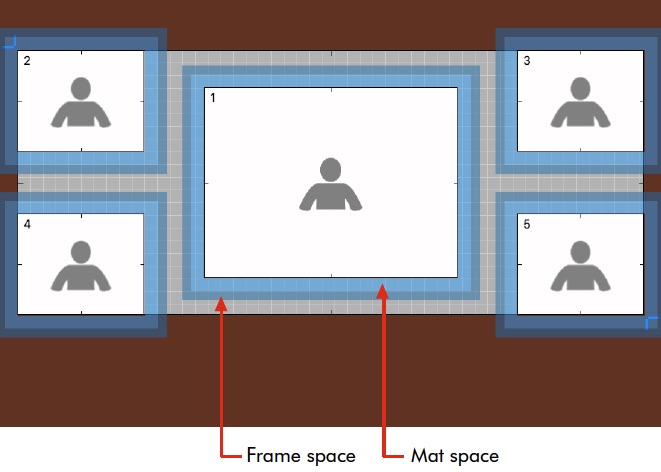
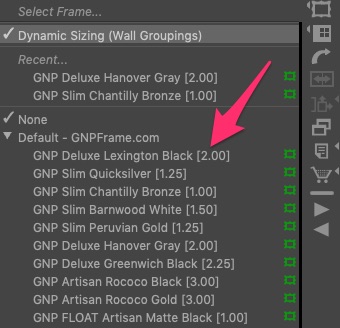
Dynamic Sizing of Wall Groupings
Wall Groupings openings now automatically expand or contract to maintain the same separation between items when you add/remove a mat or frame to the layout.
Original Wall Grouping...

Add a Frame...
Add a Mat and Frame...

This feature is turned on by default. You can turn it off by unchecking "Dynamic Sizing (Wall Groupings)" at the top of the Select Surrounding Mat and Select Frame tool popup menus.
When on, Dynamic Sizing will also be used when you drag and drop wall grouping templates to duplicate and swap the templates in Thumbnail view in Working with Layouts.
To learn more about this feature, see the Tutorial Movie: Dynamic Sizing of Layouts for Mats and Frames.
TopPerfect Arrangements to your Wall Designs
ProSelect 2022r1 now adds "Snap to Gap" to the usual edge & center snap alignment tools available in Working with Rooms.
When dragging the position of an item , the outer edges (including any mat or frame) will now automatically snap to a position that matches the gaps between other already positioned items.
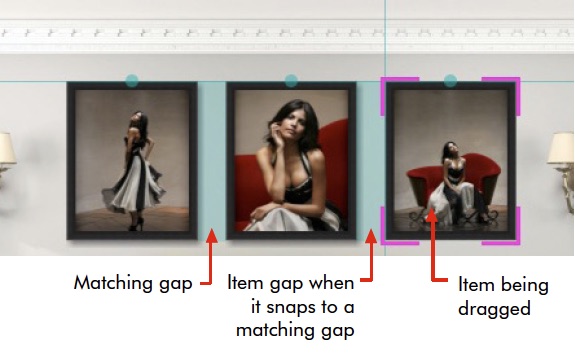
This feature also works the same way in the Template Editor when you have Snap to Objects and Edges turned on and are NOT using the Auto-Spacing feature.
To learn more about this feature, see the Tutorial Movie: Snap to Gap.
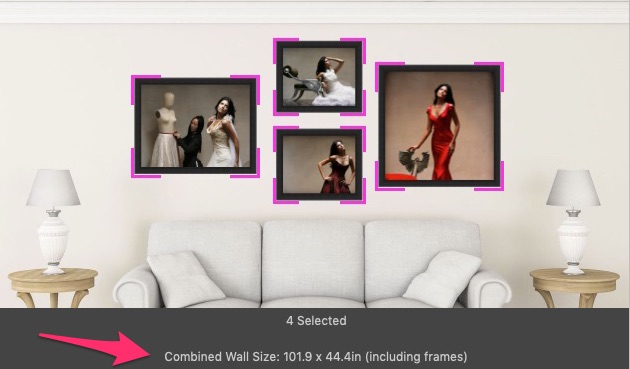
TopShowing the Size of a Wall Design
In Working with Rooms,when more than one item is selected, the overall wall space used, including any mats and frames, is displayed in the Info Bar. This is useful for photographers using an overall size pricing model.
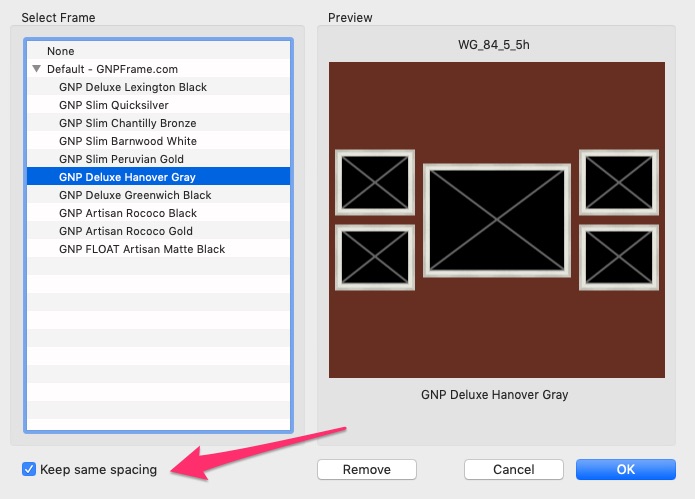
Designing Wall Groupings is even easier in the Template Editor
Use the new Show Surrounding Mat & Frame Spacing tool to show the space used by any applied surrounding mat and frame. Apart from using this tool to visually adjust the position of the openings to allow space for these, you can also turn on the Auto-spacing feature to quickly set the same spacing between the outer edges of any applied mat and/or frame.
The overall size of the template, including any assigned mats or frames, is now displayed below the design area.

When assigning or changing a Surrounding Mat or Frame for a Wall Grouping Template, checking the Keep Same Spacing checkbox will automatically re-adjust the position of the openings and the size of the template to maintain the same gaps between the outside of any new mat or frame combination.
More Frames in ProSelect Pro!
The ProSelect Pro version now allows you to have up to 500 frames to your Available Frames list.
Frame management in the Setup Frames window has been improved - it now shows frame sizes in the Available Frames list and there are new sorting options and a shortcut button to access the Price List setup window.
You can now also display the width frame in the popup and dropdown frame menus.
The default frames in ProSelect include a range of popular frames from GNP Frame. You can download their full collection through the ProSelect Partners downloads page.
TopNew Order Assembly Report
You can use this new report as a printed checklist for completing all steps in your fulfillment process. You can define up to six checkbox columns with legend descriptions customize for your studio.
The optional summary section (at the bottom of this report) shows order counts by Presentation Options, Sizes, Frames, Mats, and Digital Files. This new summary format is also available on the standard Order Report.
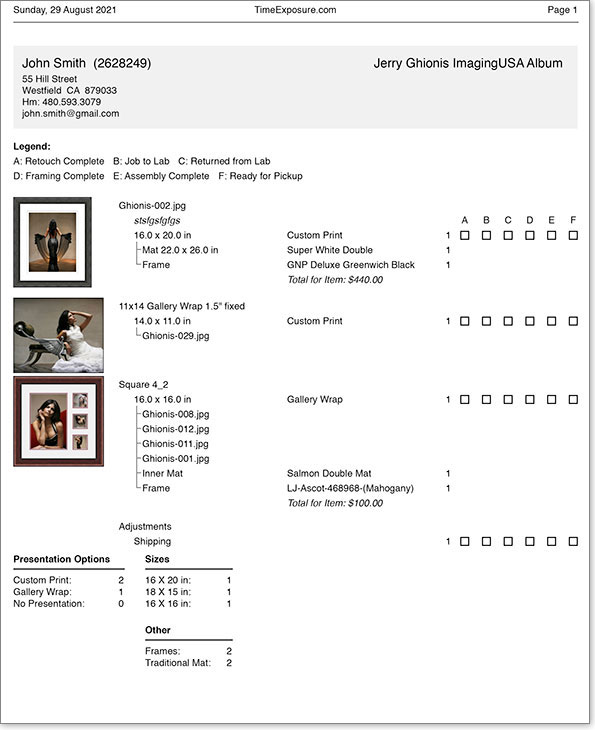
Add QR Codes to your Reports
You can add custom QR Codes to your Order Report and Order Assemby Reports.
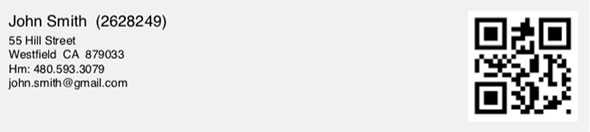
QR codes can contain job/order/client-specific data by added text tags to the code. For example, you could create a QR code with a website URL containing the client's Account Code or Name to allow you to use a QR reader to open the client's details in a web-based studio management system.
TopNew "Fixed Price by Size" (FPS) Pricing Method
This pricing method is designed to be used for pricing frames or mats from suppliers whose pricing is calculated based on individual sizes. It can also limit size availability to that offered by your lab or framing supplier. When using this Pricing Method, you can add any available sizes and the wholesale price (with a markup) to your selling price for each size.
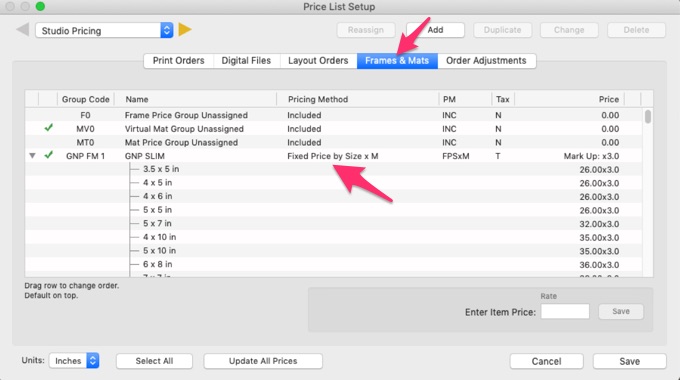
ProSelect will show you which frames (and mats) are available to match with your selected print or layout size by displaying a green or red icon in the popup menus.
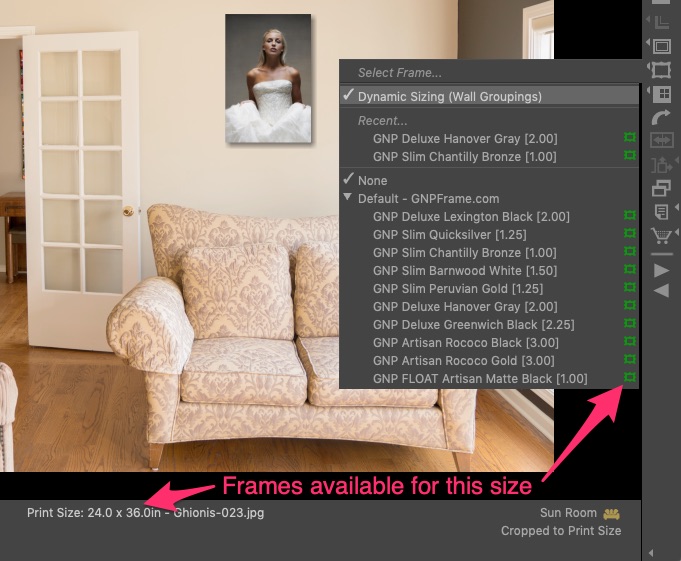
Likewise, once you select a Frame or Mat, ProSelect will show you which sizes can be used with those frames, mats and any combinations of these.
Using FPS for Custom Size Pricing
You can setup your FPS Price Group to "Allow Custom Sizes". When this is selected, any size is allowed (up to the largest offered), but the calculated pricing of any "in-between sizes" is based on the price of the next largest size (by perimeter size or "United Inches").
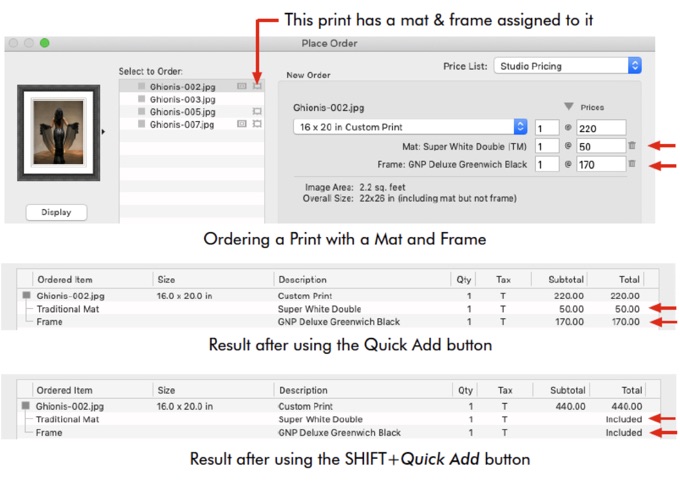
TopNew Shortcut to Combine Frames, Mats & Extras when Ordering
In the Place Order window, you can now SHIFT-click on the Quick Add button to combine the prices of the Mat and Frame items into the main items price. The mat and frame prices will then be listed as "included."
This shortcut also works in the Custom Product and Add with Extras windows for all positive priced extras.
Other New Features
- You can now select to automatically open the Client Setup window when starting a new album. This is controlled by the checkbox in Preferences -> General Settings -> General -> General Defaults: On new Album : Open Client Setup.
- You can now use the right-click menu option to Reapply Template on alayout that you have added to your order. This also works when in Working with Rooms.
- "No Results" warnings are now shown in the image list and relevant areas when the image list filter or template Smart filter results in no thumbnails shown.
- When adjusting the size of a non-fixed size layout, by default, only the best fit options for each paper size are now used or shown when you right-click on the Larger/Small size icons. You can press Alt/Option before right-clicking to show all applicable paper sizes.
- To allow for the design of large templates like class composites, the maximum number of permitted openings in a single template is now 300. Be aware that you will need a fast computer to utilize this feature since screen update times are proportional to the included openings count.
- In the Mat Designs window, you can now select multiple items and change or set the Price Groups assigned to all selected mats simultaneously.
- The Mat Designs window now includes a Setup button in the Price Groups area to directly open the Price List Setup window.
- When a price is added or changed in the Place Order window, clicking the "Custom Product" or "Add with Extras" buttons will carry the entered prices to the next window.
- If some items are "non-taxable" in your price list and the current tax is set to apply tax on all items, the Place Order window now displays any non-taxable items with a red "T*" (rather than a black "N").
- When setting up Price Groups for Frames and Mats in the Setup Prices & Products window, you can now select "Included" as a Pricing Method. This setting will always return a $0 value when ordered.
- When showing Price Calculations in the Ordering windows, the Group Code of the Price Group used is now shown at the front of the text. eg GNP1 (FPSxM): $69 x 2.5.
- When Importing a Collection which includes some frames, if your remaining free frame slots are less than the frames in the Collection, the new frames are now added to your Available Frames list until all slots are filled. Any remaining frames are loaded into your Frame Resources area so you can manually install these after freeing up some frame slots.