


With ProSelect 2018r1 and newer, default display sizes for print and layouts work a little differently than in earlier versions. Default sizes are used when displaying a print or layout for the first time in Select Size view (in working with Images or Working with Layouts) or when adding either of these to a room in Working with Rooms.
In both cases, ProSelect saves the last displayed size in the Album file so they will be at that same size next time you open the album. Note: There is an option to reset this for Prints (see the section below).
Displaying Prints
The default size for any prints is controlled in your Preferences -> Display -> Calibration & Options -> Print Sizing: Starting Size. You can select any of your setup Print Paper Sizes (which are set to be Used for Sizing in the Print Paper Sizes window (under the Orders menu).
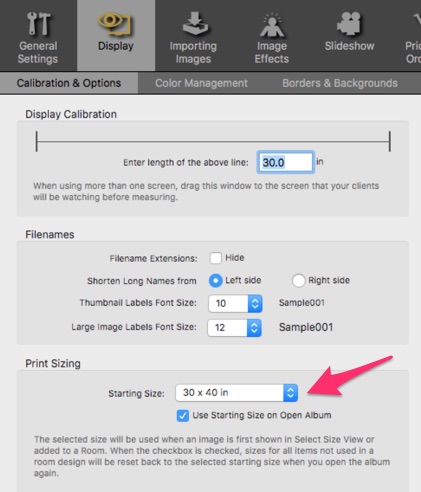
While setting up your album file for the viewing if you change this size to different size (eg when showing the print in a Room) but you still wish to show it at the default size when first showing it to your client, check the Use Starting Size on Open Album checkbox.
Displaying Layouts
Layouts created from non-fixed-sized templates always initially display at their design size. This is the size that you originally designed them at in the Template Editor. They can then be sized up or down to different print paper sizes using the Larger Size and Smaller Size toolbar buttons. See article: How Layouts are Sized.
Moving up from earlier versions
In pre-2018r1 versions of ProSelect, you could set the default starting size for Layouts in the Preferences but this option has been replaced to now using the design size. If you were using layouts to show single image prints with a surrounding mat, then you should now show them as prints with an added surrounding mat in Working with Images, Select Size view or Working with Rooms.
See this movie for more about using Surrounding Mats on prints: Creating a Traditional Mat.
Using this method is much more flexible and you can set the default starting size for these as described above in the Displaying Prints section.
If you have any non-fixed size, multi-image layouts that you wish to start displaying at a larger size than their current design size, you can either:
- Re-design the template (in the Template Editor) to make it that size, or
- Add the template to your album before the client viewing and adjust the size to your preferred starting size using the Larger Size and Smaller Size toolbar buttons (while in Select Size view in Working with Layouts or Working with Rooms). This size will be saved in Album file and the layout will be displayed at that size when first shown to your client.
KnowledgeBase Article: Default Layout and Print Sizing